[2023/03/27] First Start.
소나무 기운 , 전자제품 개발/생산
ESP32 4.3" TFT-LCD HMI - 4. TFT 예제 살펴보기(Explore Examples)
TFT-LCD를 사용한 예제를 Compile하고 Download하여 시험해 보도록 하겠습니다.
이 과정은 "2. 제품 상세 소개 및 관련자료 설명"에서 받은 데이터 중 6-User's Manual의 Getting started 4.3 inch.pdf 를 설명한 내용입니다.
ESP32 4.3" TFT-LCD HMI - 2. 제품 상세소개 및 관련 자료 설명(Detailed introduction & Materials introduction)
[2023/03/21] First Start. 소나무 기운 , 전자제품 개발/생산 ESP32 4.3" TFT-LCD HMI - 2. 제품 상세소개 및 관련 자료 설명(Detailed introduction & Materials introduction) 제품을 구매하였습니다. https://ko.aliexpress.com/item
pineenergy.tistory.com
Install Arduino IDE
워낙 많이 소개되어 있을 테니 설치하시면 됩니다.
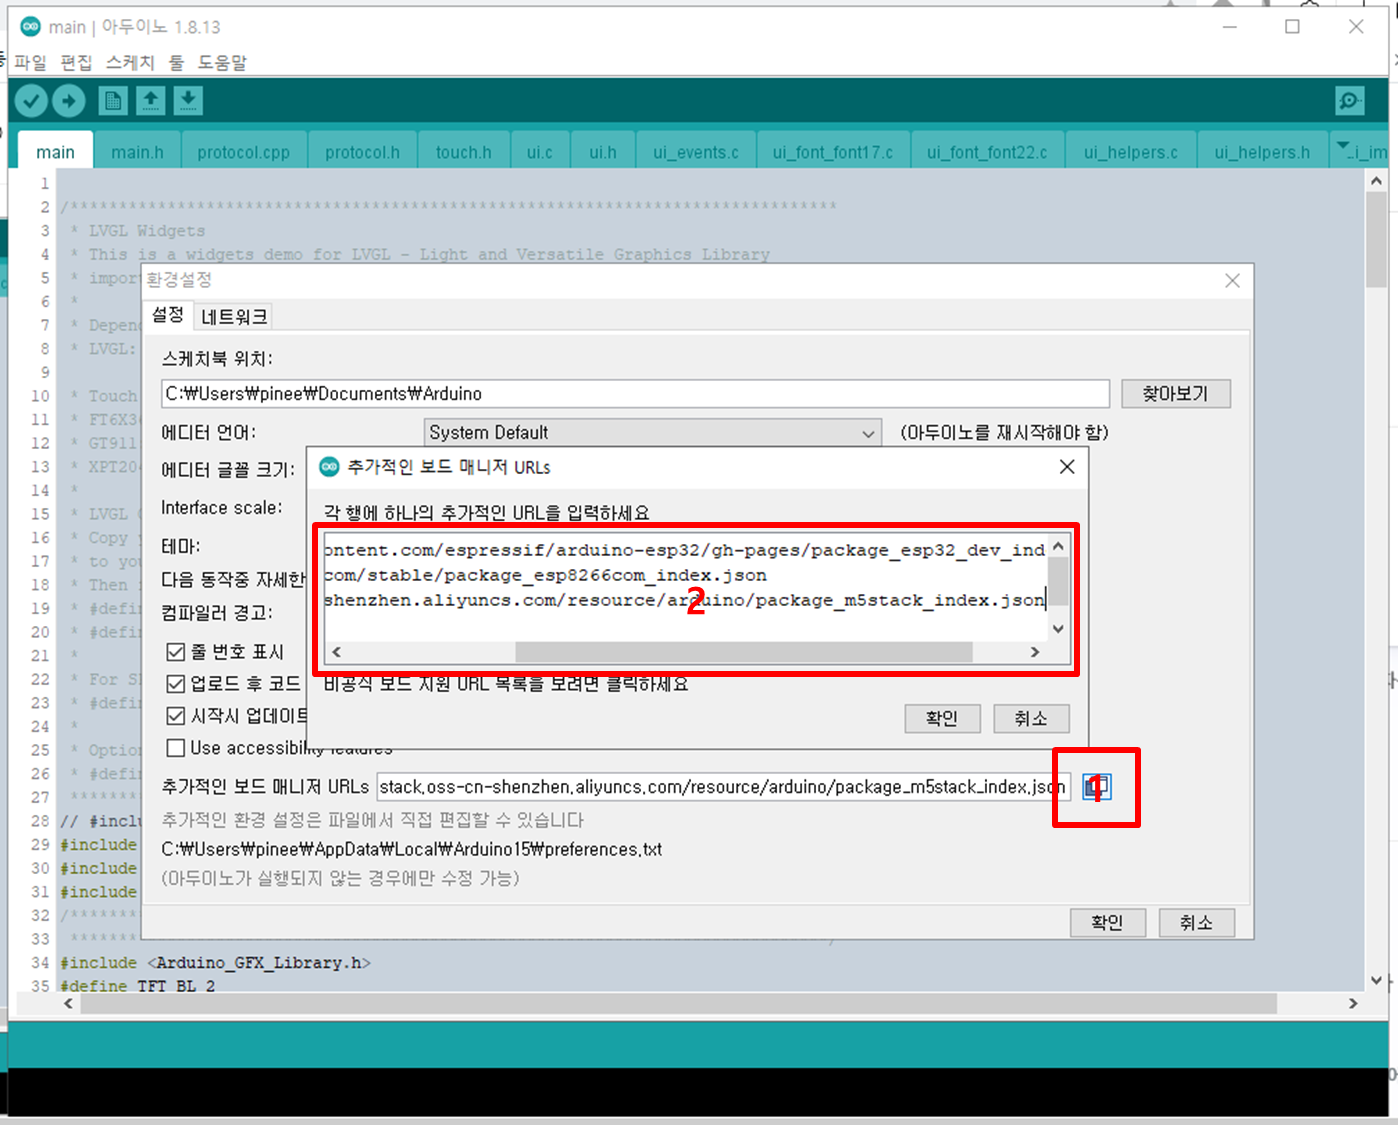
설치 후에는 ESP32 보드 정보를 가져올 수 있도록 링크를 걸어주어야 합니다.

파일>환경설정 선택

추가적인 보드메니져 URLs의 버튼을 선택하고 다음 값 추가하세요."https://raw.githubusercontent.com/espressif/arduino-esp32/gh-pages/package_esp32_dev_index.json"

이제 BOARD를 선택해 줍니다. 그 외에 CPU Frequency, Flash Mode, Flash Size, Partition SchemePSRAM등을 선택해 줍니다.
관련 자세한 사항은 ESP32-S3 datasheet를 확인하면 됩니다.
Copy Library
자료에는 예제에서 사용하는 라이브러리가 포함되어 있습니다.
1-Demo > Demo_Arduino > Libraries 에 포함되어 있습니다.

Arduino_GFX-master : Arduino graphic library
ESP32-audioI2S-mater : esp32 audio library
GT911-arduino-main : capacitive touch library ( 우리는 Resistive touch 를 사용 할 겁니다. 이후 따로 설명합니다.)
lvgl : Light and Versatile Graphics Library
이렇게 4개의 라이브러리가 보입니다.
이 Library를 Arduino의 Library folder 복사합니다.
위치는
c:\Users\User Name\Documents\arduino\libraries입니다.
Open "Hello world" project
이제 샘플 프로젝트 "Hello world"를 컴파일하고 실행해 보겠습니다.
Arduino_GFX-master : Arduino graphic library
HelloWorld.ino파일을 열어보면 다음과 같습니다.
void setup(void)
{
    gfx->begin();
    gfx->fillScreen(BLACK);

#ifdef TFT_BL
    pinMode(TFT_BL, OUTPUT);
    digitalWrite(TFT_BL, HIGH);
#endif

    gfx->setCursor(10, 10);
    gfx->setTextColor(RED);
    gfx->println("Hello World!");

    delay(5000); // 5 seconds
}

void loop()
{
    gfx->setCursor(random(gfx->width()), random(gfx->height()));
    gfx->setTextColor(random(0xffff), random(0xffff));
    gfx->setTextSize(random(6) /* x scale */, random(6) /* y scale */, random(2) /* pixel_margin */);
    gfx->println("Hello World!");

    delay(1000); // 1 second
}
gfx를 초기화 하고나서 loop()에서는 화면위에 Random으로 "Hello World!" 표시합니다. 색, 크기, 위치를 변경해 가면서 1초에 한번씩 표시합니다. 선언부의 내용은 다음과 같습니다.
/*******************************************************************************
 ******************************************************************************/
#include <Arduino_GFX_Library.h>

#define GFX_BL DF_GFX_BL // default backlight pin, you may replace DF_GFX_BL to actual backlight pin
#define TFT_BL 2
/* More dev device declaration: https://github.com/moononournation/Arduino_GFX/wiki/Dev-Device-Declaration */
#if defined(DISPLAY_DEV_KIT)
Arduino_GFX *gfx = create_default_Arduino_GFX();
#else /* !defined(DISPLAY_DEV_KIT) */

/* More data bus class: https://github.com/moononournation/Arduino_GFX/wiki/Data-Bus-Class */
//Arduino_DataBus *bus = create_default_Arduino_DataBus();

/* More display class: https://github.com/moononournation/Arduino_GFX/wiki/Display-Class */
//Arduino_GFX *gfx = new Arduino_ILI9341(bus, DF_GFX_RST, 0 /* rotation */, false /* IPS */);

Arduino_ESP32RGBPanel *bus = new Arduino_ESP32RGBPanel(
    GFX_NOT_DEFINED /* CS */, GFX_NOT_DEFINED /* SCK */, GFX_NOT_DEFINED /* SDA */,
    40 /* DE */, 41 /* VSYNC */, 39 /* HSYNC */, 42 /* PCLK */,
    45 /* R0 */, 48 /* R1 */, 47 /* R2 */, 21 /* R3 */, 14 /* R4 */,
    5 /* G0 */, 6 /* G1 */, 7 /* G2 */, 15 /* G3 */, 16 /* G4 */, 4 /* G5 */,
    8 /* B0 */, 3 /* B1 */, 46 /* B2 */, 9 /* B3 */, 1 /* B4 */
);
// option 1:
// ILI6485 LCD 480x272
Arduino_RPi_DPI_RGBPanel *gfx = new Arduino_RPi_DPI_RGBPanel(
  bus,
  480 /* width */, 0 /* hsync_polarity */, 8 /* hsync_front_porch */, 4 /* hsync_pulse_width */, 43 /* hsync_back_porch */,
  272 /* height */, 0 /* vsync_polarity */, 8 /* vsync_front_porch */, 4 /* vsync_pulse_width */, 12 /* vsync_back_porch */,
  1 /* pclk_active_neg */, 9000000 /* prefer_speed */, true /* auto_flush */);

#endif /* !defined(DISPLAY_DEV_KIT) */
/*******************************************************************************
 * End of Arduino_GFX setting
 ******************************************************************************/
16bit color를 사용하며 back light를 사용합니다.
전체 코드 내용입니다. 참고하세요.
/*******************************************************************************
 ******************************************************************************/
#include <Arduino_GFX_Library.h>

#define GFX_BL DF_GFX_BL // default backlight pin, you may replace DF_GFX_BL to actual backlight pin
#define TFT_BL 2
/* More dev device declaration: https://github.com/moononournation/Arduino_GFX/wiki/Dev-Device-Declaration */
#if defined(DISPLAY_DEV_KIT)
Arduino_GFX *gfx = create_default_Arduino_GFX();
#else /* !defined(DISPLAY_DEV_KIT) */

/* More data bus class: https://github.com/moononournation/Arduino_GFX/wiki/Data-Bus-Class */
//Arduino_DataBus *bus = create_default_Arduino_DataBus();

/* More display class: https://github.com/moononournation/Arduino_GFX/wiki/Display-Class */
//Arduino_GFX *gfx = new Arduino_ILI9341(bus, DF_GFX_RST, 0 /* rotation */, false /* IPS */);

Arduino_ESP32RGBPanel *bus = new Arduino_ESP32RGBPanel(
    GFX_NOT_DEFINED /* CS */, GFX_NOT_DEFINED /* SCK */, GFX_NOT_DEFINED /* SDA */,
    40 /* DE */, 41 /* VSYNC */, 39 /* HSYNC */, 42 /* PCLK */,
    45 /* R0 */, 48 /* R1 */, 47 /* R2 */, 21 /* R3 */, 14 /* R4 */,
    5 /* G0 */, 6 /* G1 */, 7 /* G2 */, 15 /* G3 */, 16 /* G4 */, 4 /* G5 */,
    8 /* B0 */, 3 /* B1 */, 46 /* B2 */, 9 /* B3 */, 1 /* B4 */
);
// option 1:
// ILI6485 LCD 480x272
Arduino_RPi_DPI_RGBPanel *gfx = new Arduino_RPi_DPI_RGBPanel(
  bus,
  480 /* width */, 0 /* hsync_polarity */, 8 /* hsync_front_porch */, 4 /* hsync_pulse_width */, 43 /* hsync_back_porch */,
  272 /* height */, 0 /* vsync_polarity */, 8 /* vsync_front_porch */, 4 /* vsync_pulse_width */, 12 /* vsync_back_porch */,
  1 /* pclk_active_neg */, 9000000 /* prefer_speed */, true /* auto_flush */);

#endif /* !defined(DISPLAY_DEV_KIT) */
/*******************************************************************************
 * End of Arduino_GFX setting
 ******************************************************************************/

void setup(void)
{
    gfx->begin();
    gfx->fillScreen(BLACK);

#ifdef TFT_BL
    pinMode(TFT_BL, OUTPUT);
    digitalWrite(TFT_BL, HIGH);
#endif

    gfx->setCursor(10, 10);
    gfx->setTextColor(RED);
    gfx->println("Hello World!");

    delay(5000); // 5 seconds
}

void loop()
{
    gfx->setCursor(random(gfx->width()), random(gfx->height()));
    gfx->setTextColor(random(0xffff), random(0xffff));
    gfx->setTextSize(random(6) /* x scale */, random(6) /* y scale */, random(2) /* pixel_margin */);
    gfx->println("Hello World!");

    delay(1000); // 1 second
}
마무리
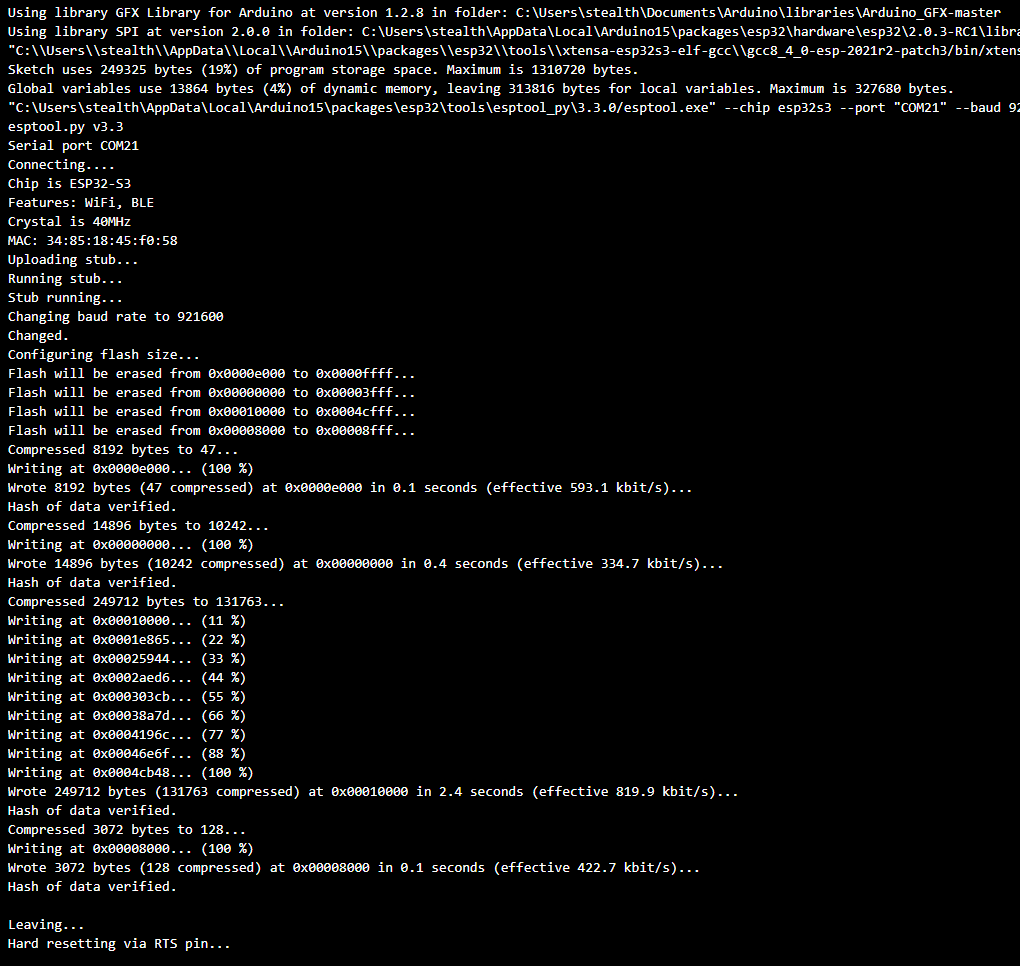
컴파일 하고 동작시키면 다음과 같이 움직입니다.
한번 보세요. 몇 줄 되지 않는 코드로 TFT-LCD가 동작하기 시작합니다.

이렇게 컴파일이 마무 되고 프로그램 라이팅까지 끝이나면 화면을 볼 수 있습니다.
참고문헌
마다음에는 터치가 없고 lvgl을 사용하지 않은 나머지 두개의 예제도 살펴보도 동작시켜보도록 할께요.
오늘 하루도 얼마 남지 않았습니다. 마무리 잘하시고 편히 쉬세요.
틀린 부분이나 질문은 댓글 달아주세요.
즐거운 하루 보내세요. 감사합니다.


댓글